> For the complete documentation index, see [llms.txt](https://wong-coupon.gitbook.io/flutter/llms.txt). Markdown versions of documentation pages are available by appending `.md` to page URLs; this page is available as [Markdown](https://wong-coupon.gitbook.io/flutter/my-flutter/architecture-state/flavor.md).
# Flavor
Set up 3 environments (dev, staging, production) for mobile in Flutter (3 separate mobile apps)
As a Flutter project grows, separating **dev / staging / production** environments becomes very important. More importantly, splitting them into 3 different apps helps ensure product quality. My goals are:
* Set up clear environments for the whole team with 3 separate apps.
* Split Firebase config by environment.
* Reduce build and release errors.
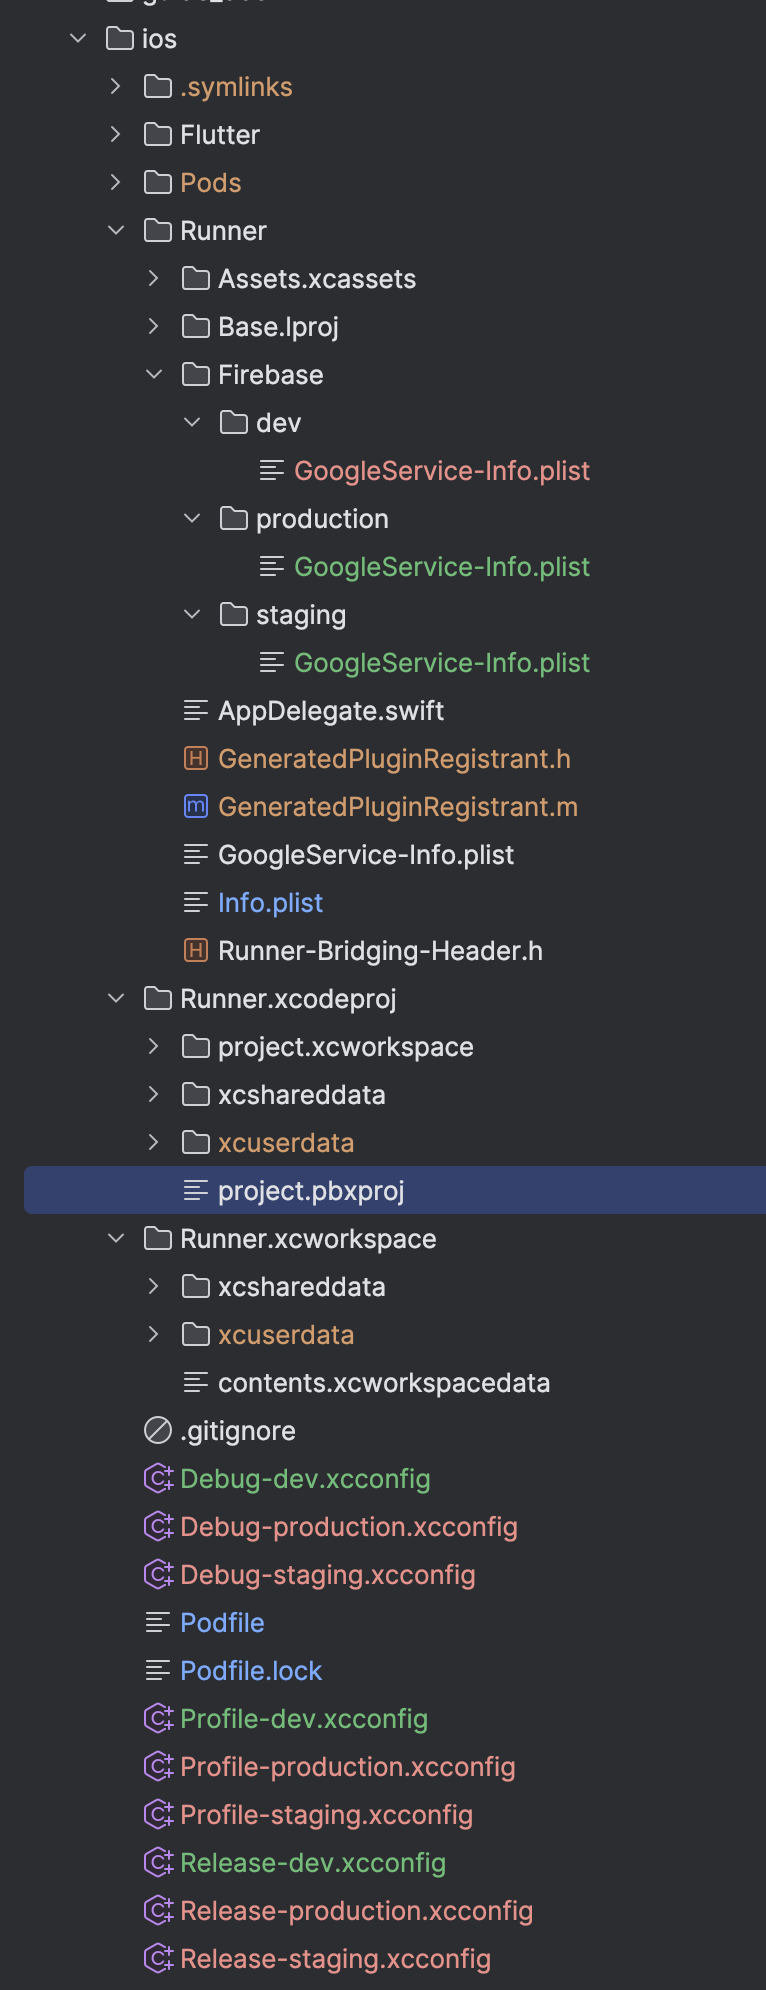
Before we start, here is what will change after setting up 3 separate apps for 3 environments.
## Android: Set up 3 environments
### Step 1: Declare environments in `android/app/build.gradle`
Go to this file:
```
/android/app/build.gradle
```
Inside the `android { ... }` block, add the following right after `defaultConfig { ... }`:
```gradle
flavorDimensions "environment"
productFlavors {
dev {
dimension "environment"
applicationIdSuffix ".dev"
versionNameSuffix "-dev"
resValue "string", "app_name", "Count Budda Dev"
buildConfigField "String", "ENV", "\"dev\""
manifestPlaceholders = [APP_ENV: "dev"]
}
staging {
dimension "environment"
applicationIdSuffix ".staging"
versionNameSuffix "-staging"
resValue "string", "app_name", "Count Budda Staging"
buildConfigField "String", "ENV", "\"staging\""
manifestPlaceholders = [APP_ENV: "staging"]
}
production {
dimension "environment"
// production keeps the base package id
resValue "string", "app_name", "Count Budda"
buildConfigField "String", "ENV", "\"production\""
manifestPlaceholders = [APP_ENV: "production"]
}
}
```
Note: `applicationIdSuffix` helps separate package IDs so multiple apps can be installed in parallel.
Then add this after `compileOptions`:
```gradle
buildFeatures {
buildConfig true
}
```
Run the following command to verify:
```bash
cd /android
./gradlew :app:tasks --all
```
### Step 2: Split `google-services.json` by flavor
Create 3 folders:
```
/android/app/src/dev
/android/app/src/staging
/android/app/src/production
```
Copy each corresponding `google-services.json` file into the correct folder.\
Note: each file must match the app ID of its environment.
How to get the files:
* Go to your project in Firebase Console.
* `Add App` -> choose Android -> enter each environment app ID.
* Download `google-services.json` for each app.
Run the following commands to verify:
```bash
cd /android
./gradlew :app:processDevDebugGoogleServices
./gradlew :app:processStagingDebugGoogleServices
./gradlew :app:processProductionDebugGoogleServices
```
### Step 3: Run Android app by flavor
#### Method 1: Run from terminal
```bash
fvm flutter run --flavor dev -t lib/main_develop.dart
fvm flutter run --flavor staging -t lib/main_staging.dart
fvm flutter run --flavor production -t lib/main.dart
```
If you do not know what FVM is, you can read this article:
{% content-ref url="/pages/757ESPKGR9SwyJPqwpIM" %}
[FVM](/flutter/my-flutter/foundations/fvm.md)
{% endcontent-ref %}
You can also apply this article to make your commands shorter:
{% content-ref url="/pages/PG14RfyD6nuNYL68vG7H" %}
[Make](/flutter/my-flutter/foundations/make.md)
{% endcontent-ref %}
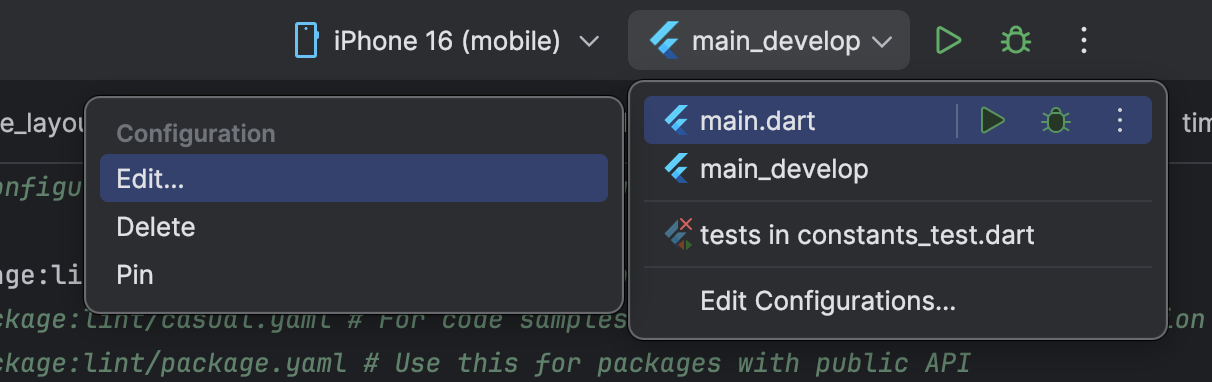
#### Method 2: Run with Configuration in Android Studio
* `Configuration` -> select `Edit`
* Fill the matching `Build flavor` (`dev`, `staging`, `production`)
* Choose the matching entry file for each environment
Run app by Build flavor in IDE
## iOS: Set up 3 environments
### Step 1: Create Configurations
Open:
```
ios/Runner.xcworkspace
```
In Xcode:
* `Runner (PROJECT) > Info > Configurations`
* Duplicate into 9 configurations:
* `Debug-dev`, `Debug-staging`, `Debug-production`
* `Profile-dev`, `Profile-staging`, `Profile-production`
* `Release-dev`, `Release-staging`, `Release-production`
Run the commands below to create `.xcconfig` files (example for `dev`):
```bash
cat > /ios/Flutter/Debug-dev.xcconfig <<'EOF'
#include "Pods/Target Support Files/Pods-Runner/Pods-Runner.debug-dev.xcconfig"
#include "Flutter/Generated.xcconfig"
EOF
cat > /ios/Flutter/Profile-dev.xcconfig <<'EOF'
#include "Pods/Target Support Files/Pods-Runner/Pods-Runner.profile-dev.xcconfig"
#include "Flutter/Generated.xcconfig"
EOF
cat > /ios/Flutter/Release-dev.xcconfig <<'EOF'
#include "Pods/Target Support Files/Pods-Runner/Pods-Runner.release-dev.xcconfig"
#include "Flutter/Generated.xcconfig"
EOF
```
In the **Based on Configuration File** column, map correctly:
* `Debug-dev -> Debug-dev.xcconfig`
* `Profile-dev -> Profile-dev.xcconfig`
* `Release-dev -> Release-dev.xcconfig`
Go to `TARGETS > Runner > Build Settings` -> filter `Product Bundle Identifier`, then change by environment.
Example for `dev`:
```
Debug-dev = ngmduc2012.com.vn.dev
Profile-dev = ngmduc2012.com.vn.dev
Release-dev = ngmduc2012.com.vn.dev
```
### Step 2: Update `ios/Podfile`
In:
```
/ios/Podfile
```
Replace:
```ruby
project 'Runner', {
'Debug' => :debug,
'Profile' => :release,
'Release' => :release,
}
```
With:
```ruby
project 'Runner', {
'Debug' => :debug,
'Debug-dev' => :debug,
'Debug-staging' => :debug,
'Debug-production' => :debug,
'Profile' => :release,
'Profile-dev' => :release,
'Profile-staging' => :release,
'Profile-production' => :release,
'Release' => :release,
'Release-dev' => :release,
'Release-staging' => :release,
'Release-production' => :release,
}
```
Run to verify:
```bash
cd /ios
pod install
```
### Step 3: Create schemes by environment
In Xcode:
* `Product > Scheme > Manage Schemes...`
* Click `+` -> choose Target `Runner` -> name it `dev`
* Tick the `Shared` column
* Select scheme `dev` -> `Edit...`
* Change to `Debug-dev`
* Do the same for the remaining ones based on this map:
* `Run = Debug-dev`
* `Test = Debug-dev`
* `Profile = Profile-dev`
* `Analyze = Debug-dev`
* `Archive = Release-dev`
Add the line below:
```
PRODUCT_BUNDLE_IDENTIFIER=ngmduc2012.com.vn.dev
```
into these 3 files: `Debug-dev.xcconfig` `Profile-dev.xcconfig` `Release-dev.xcconfig`
Run to verify:
```bash
cd
fvm flutter build ios --simulator --flavor dev -t lib/main_develop.dart
```
Then do the same for `staging` and `production`.
### Step 4: Create Firebase config files by environment
Create directories for Firebase:
```bash
mkdir -p /ios/Runner/Firebase/dev
mkdir -p /ios/Runner/Firebase/staging
mkdir -p /ios/Runner/Firebase/production
```
Copy the 3 corresponding `GoogleService-Info.plist` files into the correct folders, making sure app IDs match.
Add `GOOGLE_SERVICE_INFO_PLIST` to all 9 `.xcconfig` files:
```
dev.xcconfig (3 files):
GOOGLE_SERVICE_INFO_PLIST=Runner/Firebase/dev/GoogleService-Info.plist
staging.xcconfig (3 files):
GOOGLE_SERVICE_INFO_PLIST=Runner/Firebase/staging/GoogleService-Info.plist
production.xcconfig (3 files):
GOOGLE_SERVICE_INFO_PLIST=Runner/Firebase/production/GoogleService-Info.plist
```
### Step 5: Add Build Phase `Select Firebase Plist`
In `TARGETS > Runner > Build Phases`:
* Click `+` -> `New Run Script Phase`
* Rename it to: `Select Firebase Plist`
* Paste this script:
```bash
set -e
if [ -z "$GOOGLE_SERVICE_INFO_PLIST" ]; then
echo "error: GOOGLE_SERVICE_INFO_PLIST is not set for ${CONFIGURATION}." >&2
exit 1
fi
SOURCE_PLIST="${PROJECT_DIR}/${GOOGLE_SERVICE_INFO_PLIST}"
DEST_PLIST="${BUILT_PRODUCTS_DIR}/${PRODUCT_NAME}.app/GoogleService-Info.plist"
if [ ! -f "$SOURCE_PLIST" ]; then
echo "error: Missing Firebase plist at $SOURCE_PLIST" >&2
exit 1
fi
cp "$SOURCE_PLIST" "$DEST_PLIST"
echo "Using Firebase plist: $SOURCE_PLIST"
```
In this phase:
* Input Files: `$(PROJECT_DIR)/$(GOOGLE_SERVICE_INFO_PLIST)`
* Output Files: `${BUILT_PRODUCTS_DIR}/${PRODUCT_NAME}.app/GoogleService-Info.plist`
Move this phase near the bottom (usually below `Copy Bundle Resources` or before signing scripts).
### Step 6: Remove static plist from Resources
In `Copy Bundle Resources`:
* Find `GoogleService-Info.plist`
* Remove it from the phase
* No need to delete the file on disk
### Step 7: `GOOGLE_REVERSED_CLIENT_ID` by environment
Add to all 9 `.xcconfig` files:
```
dev (3 files):
GOOGLE_REVERSED_CLIENT_ID=com.googleusercontent.apps.xxxxx-dev
staging (3 files):
GOOGLE_REVERSED_CLIENT_ID=com.googleusercontent.apps.xxxxx-staging
production (3 files):
GOOGLE_REVERSED_CLIENT_ID=com.googleusercontent.apps.xxxxx-production
```
The value comes from the `REVERSED_CLIENT_ID` field in each `GoogleService-Info.plist` file.
Edit `/ios/Runner/Info.plist`:
```xml
CFBundleURLSchemes$(GOOGLE_REVERSED_CLIENT_ID)
```
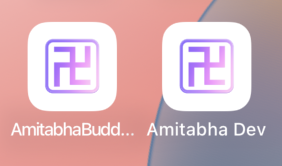
### Step 8: Change App Name by flavor
Add to all 9 `.xcconfig` files:
```
dev (3 files): APP_NAME=Amitabha Dev
staging (3 files): APP_NAME=Amitabha Staging
production (3 files): APP_NAME=Amitabha Buddha
```
Edit `ios/Runner/Info.plist`:
```xml
CFBundleDisplayName$(APP_NAME)
```
## Run app by flavor (iOS/Android)
### Method 1: Run debug from terminal
```bash
fvm flutter run --flavor dev -t lib/main_develop.dart
fvm flutter run --flavor staging -t lib/main_staging.dart
fvm flutter run --flavor production -t lib/main.dart
```
### Method 2: Run via IDE / Xcode
* Android Studio/VS Code:
* `Configuration > Edit`
* Fill the matching `Build flavor`
* Choose the matching entry file for each environment
Run app by Build flavor in IDE
* Xcode:
* Choose the correct scheme `dev` / `staging` / `production`
* Run directly with that scheme
Note: Instead of creating 3 apps, you can simplify it to 2 apps for 2 environments to reduce setup effort.
After each build selects the correct Firebase project, the Remote Config lifecycle still needs its own boundary. The following article shows how I separate fetch, activation, typed snapshots, and the real-time listener without repeating the flavor configuration.
{% content-ref url="/pages/VlHUWEnrJDCc9sRZw2rf" %}
[Firebase Remote Config and feature flags](/flutter/my-flutter/security-observability/firebase-remote-config-feature-flags.md)
{% endcontent-ref %}
## Conclusion
Above is how I separate familiar environments (**dev, staging, production**) into 3 separate applications. Here is the result:
If you want to standardize from the start for your team, combine this with the **Base Project** article to build your own project template:
{% content-ref url="/pages/awFEXKYydCCmZKw6vQIk" %}
[Base Project](/flutter/my-flutter/architecture-state/base-project.md)
{% endcontent-ref %}
[Buy Me a Coffee](https://buymeacoffee.com/ducmng12g) | [Support Me on Ko-fi](https://ko-fi.com/I2I81AEJG8)